In this scenario, my customer JT, had a 15 year old heat pump and wanted gas piping for a new gas range and while at that project install a new gas furnace. So here’s some critical points on how to install a dual fuel heat pump.
JT explained he didn’t use air conditioning or cooling only once last year and it wasn’t a priority.
As I reasoned with them about their use of air conditioning and how long they planned to live in the home, I told him how we could keep the heat pump since it was working and use it along with a gas furnace.
With the gas furnace doing all the of the heating, the heat pump would last for many more years if just used for cooling once or twice a year. And upon the sale of the home, should that come, the house would have that much desired option of cooling for hot summer days.
Below is how their system looked before demolition.
A supply plenum is the warm air duct that connects to the furnace. The supply and the return duct look like the same duct, but there is a divider in the duct that separates the two.
The return duct is the air coming from the interior of the home to be heated or cooled.
It had a really bad filter system that was hard to access and did a really crappy job. I’m a big fan of Honeywell filters and that’s what I proposed to this customer. Take a look at what he got.
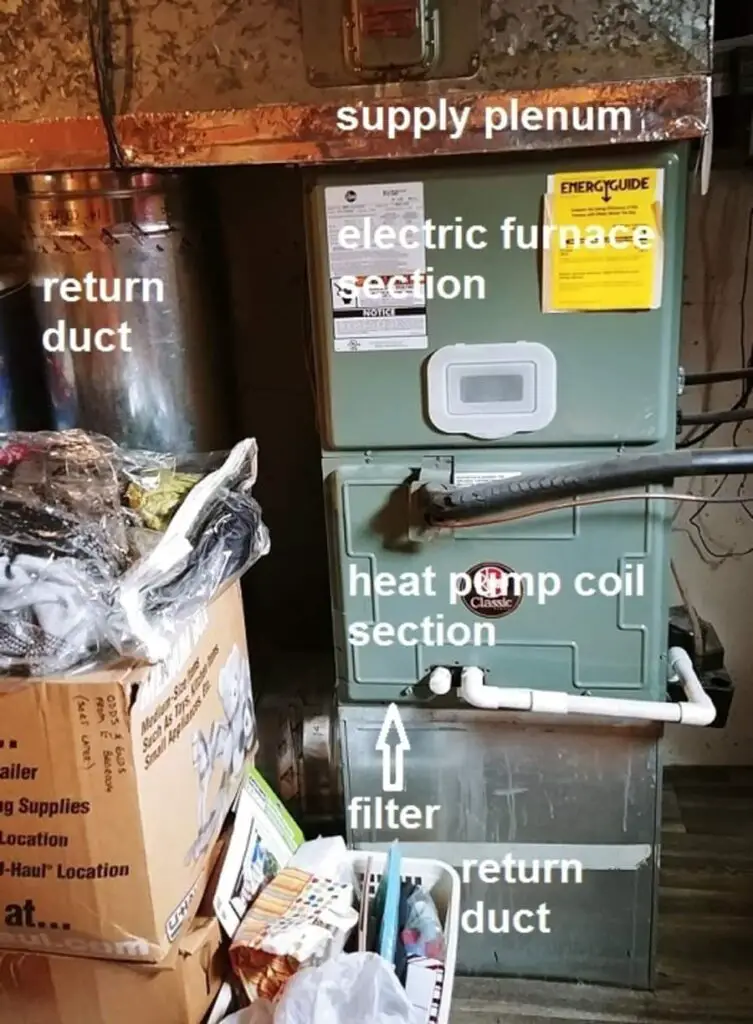
Last year I went there after he had just bought the house because he couldn’t even find the filter.
That filter was plugged like a board in the hole. Hard to access means changing the filter don’t get done much.
The heat pump section is the coil that connects to the outdoor unit or heat pump itself. It connects to the outdoor unit via that black line that starts just above the word “heat”.
The electric furnace section holds the strip heaters that supplement the heat pump in extreme cold weather since a heat pump struggles to create heat in sub zero temperatures.
This same electric heat is also used as emergency heat to use in case a problem stops the outdoor heat pump unit from working.
The arrow that shows the filter location also indicates the direction of the air flow through the system.
That filter I mentioned that was hard to find, it was one of those ineffective one inch 20 X 20 filters that stop feathers and golf balls.
Demolition Of Existing Heat Pump Furnace
The first step in the removing the existing air handler from the duct work was to remove the R-22 refrigerant from the compressor system. You might know this refrigerant as Freon. It’s capitalized because Freon is a brand name. Like Kleenex.
Problem was, when removing the refrigerant, the system label said the factory charge was 7.5 pounds. This unit only had 2.5 pounds in the sealed system.
I explained the problem to JT and he was good with me recharging the system when we finished the installation and he would pay for the additional refrigerant.
So this is what we have now that the refrigerant charge is removed and the old furnace which served as the air handler for the heat pump system is removed.
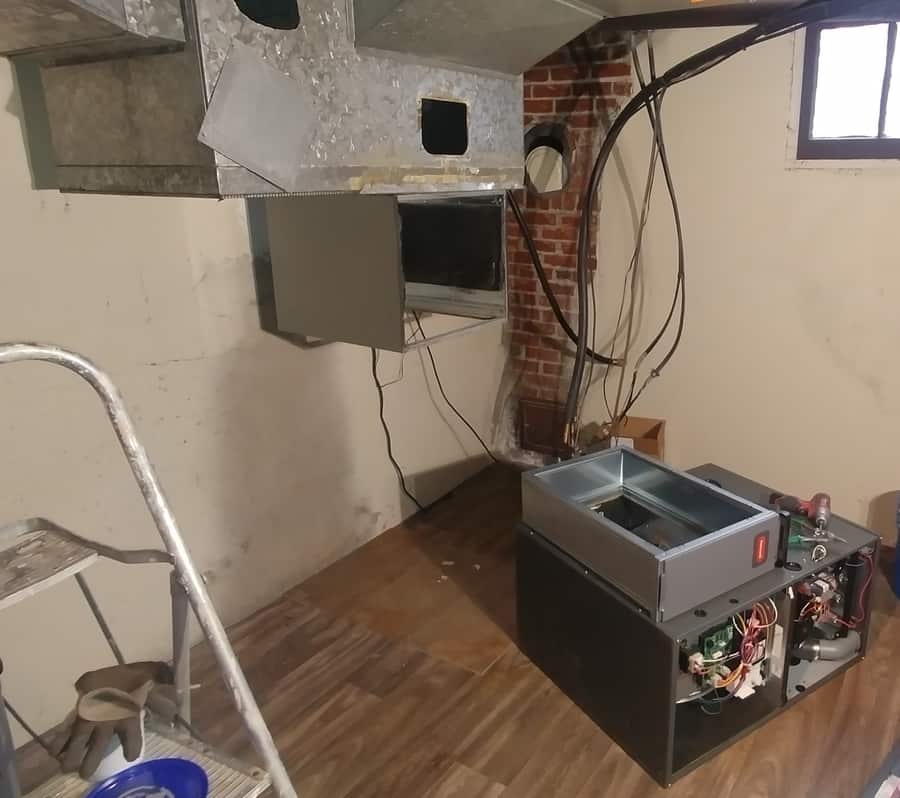
Notice the empty cabinet hanging under the supply duct. I removed the refrigeration coil to clean it at the shop.
The poor filtering and lack of maintenance over the years had impacted the fins of the coil with dust and junk so much that the shop was just a better place to really get it clean.
This being a Rheem unit, they are extremely hard to get clean, especially when in the cabinet.
Duct Sealing From Inside The Duct
Before I hung that coil cabinet, I crawled up inside that duct work and sealed it with a duct mastic. There were a lot of leaks from all the changes that had taken place with this system since it was first an oil furnace.
This mastic is a great product that can be used by even sealing on the outside of your duct work. Amazon has a selection right here and I recommend it highly.
Just grab a cheap brush and apply it to all the seams. It spreads easily and washes off with water. You’ll be surprised that it can even help with reducing noise in some systems.
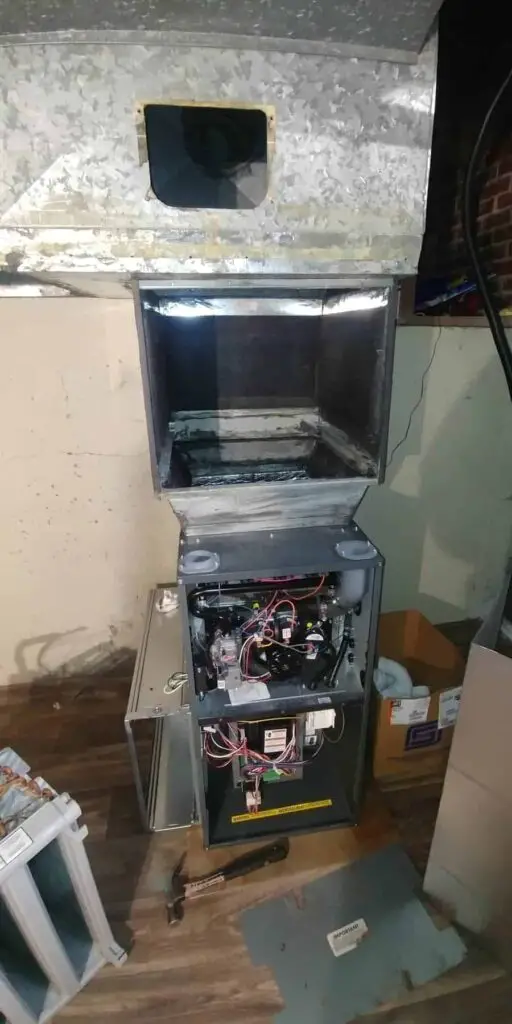
After sealing as much duct as I could reach I began assembling the unit.
Installing High Efficiency Gas Furnace
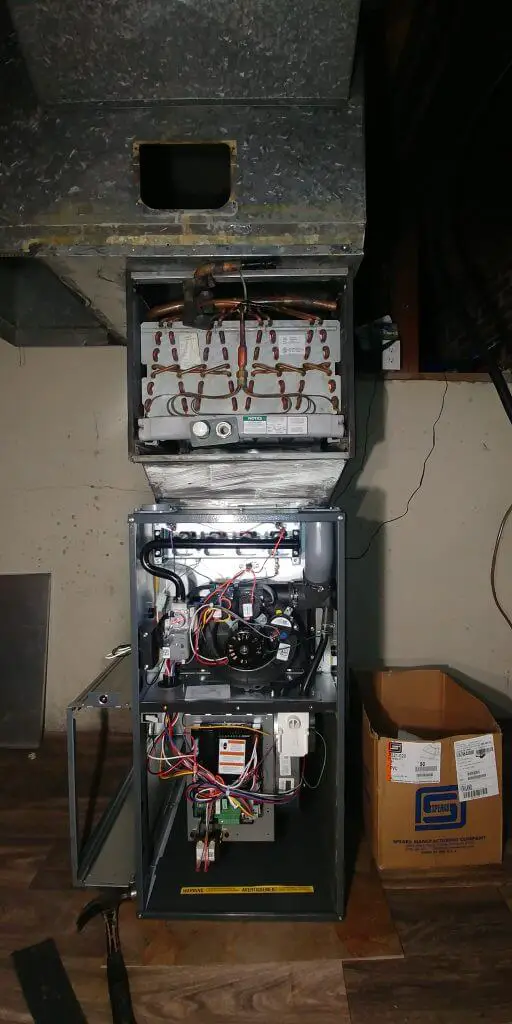
If you go back to the top photo, pay attention to the location of the heat pump coil section. It’s under the electric furnace section. You’ll notice that I’m installing the coil on top of the gas furnace.
So why would I even bring this to your attention?
Two things will happen to destroy your new gas furnace if the coil is before the furnace instead of after.
With the air flow entering the coil first and then the furnace, in the cooling mode, condensation will form on the inside of the heat exchanger and create rust.
Unlike an electric furnace, a gas furnace and the heat pump cannot operate at the same time.
This is the result when a coil is on the wrong side of the supplemental heat.
Pressures in the sealed system that holds the refrigerant got so high that it seeped past the valve and blew the top of the cap off. I’ll bet the blew with near the velocity of a bullet. I have a little more detail about this fiasco in another article if you care to read.

With the Honeywell filter can attached and the Rheem heat pump coil inserted into the coil cabinet things are beginning to take shape.
I love these Honeywell air cleaners. The door is magnetic and easy to remove. The filter will be easy to check and replace.
Be advised, if you use one of these filters to always buy an exact replacement.
Poorly fitting filters will let dust and other particles pass through the system and clog that heat pump coil.
You would be headed into a predicament that will diminish your air flow and destroy your system.
I have the return drop assembled and ready to hang from that rectangular hole you can see at the top left.
This is a Goodman GMVM970803BN furnace. It’s fully modulating which means it doesn’t just turn on and off like standard efficiency furnace.
The circuit board in the control panel tells the system only turn on enough heat and air flow to do what’s needed.
It’s super quiet. This customer was amazed at the difference compared to his old heat pump air handler.
It’s exhaust is vented in PVC pipe as opposed to metal B-Vent that is 80% efficient cousin is vented with.
The reason these furnaces can be vented in PVC is that they recoup more of the heat that would normally go up the chimney.
So now the flue temperature is much lower and PVC can be used for the venting. Another reason that we have to use PVC is that 90+ efficient furnaces are what’s called condensing furnaces.
Condensing furnaces create condensation in the process of creating heat. It’s a bit hard to see in the above image, but at the bottom right of the furnace is a condensate pump, right next to that small section of 3/4 PVC pipe.
PVC venting for condensing furnaces is sloped back towards the furnace because that condensation needs to drain back through the furnace in special places and a trap, just like the traps in your plumbing fixtures.
Then into the condensate pump to be pumped to a drain or outside. Special care needs to be take to prevent the vent pipe and condensate lines from freezing on the outside during extreme cold weather.
Exhaust terminations in cold weather areas should be insulated. These need to be insulated yet. The two pipes are exhaust on the right and the air intake to the burners on the left.
The reason for the crazy configuration is to raise the vent opening above any anticipated snow fall.
Each has a bird screen installed just inside the 90 degree elbows. Long radius elbows are important to allow as much air in and out of the venting system.
Final Words
The customers last words were ” the house is much more comfortable in every room. The noise is much less and we are thrilled.”
Amazon has Honeywell filter cans and replacement filters. You can check prices by going to there website here. Be sure to be exact and get the right size of which there are about three different sizes.
Don’t always buy the most efficient filters unless you are going to have a static pressure test done on your furnace.